
We at Manchester Refrigeration+ have a two man team available for cold room refrigeration installation in Manchester. Our lead engineer has a car with all of the commissioning and technical equipment and our installation engineer has a van with all of the heavier equipment and materials.
Job Planning
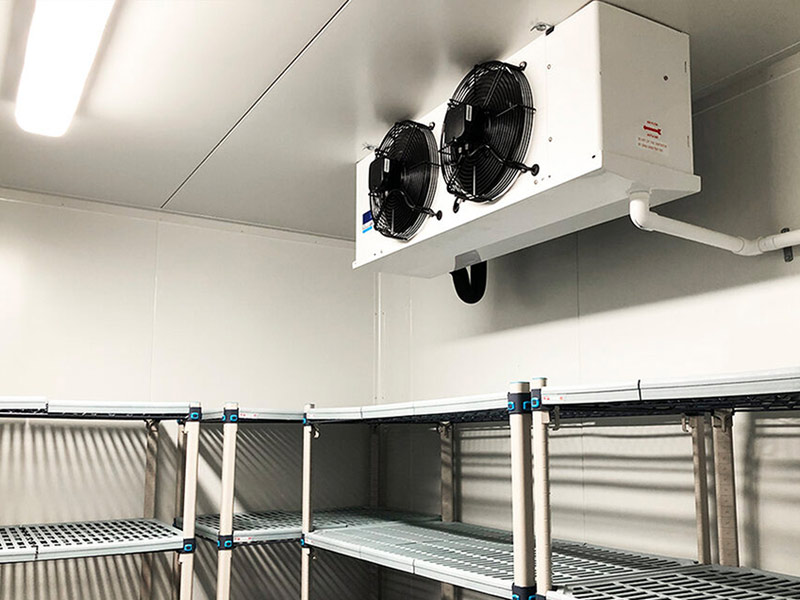
Our team met at the suppliers in Trafford Park on the day before the scheduled date for the job. Our lead engineer has a list of the required parts and materials. This included: Unistrut and fittings, copper pipework and lagging. The evaporator in the photo and the condenser had already been delivered to site. The cold room walls had already been built and the electrician had run the electrical cable into isolators in a convenient location near to where the condenser and evaporator were going to be installed.
Evaporator Installation
For ease of installation, we have at our disposal a Genie lift. This is a power free lifting platform operated by a winding handle connected to cables. It is a really good piece of kit as it allows for the precise positioning of evaporators without any stress to the engineers.
Marking Out during Cold Room Refrigeration Installation Manchester
Our lead engineer took measurements from the evaporator mounting feet and marked out the ceiling of the cold room. On the other side of the cold room insulation is a roof void which is accessed with a ladder.
Drilling and Fitting
After the marking out, our installation engineer drilled the four holes required for the threaded rod to be pushed through. The threaded rod was then secured on top of the cold room using Unistrut, washers and bolts.
Lifting In during Cold Room Refrigeration Installation Manchester
With the Ginie Lift in place, the evaporator was moved into position. The evaporator was then secured with bolts and washers and checked that it was level with a spirit level.
0161 237 3727
service@maximuschillers.com
Condenser Installation
This was an easy part of the job as a concrete pad had already been built to the dimensions required for the condenser. Our team used a trolley to move the condenser into position, then it was bolted into place.
Interconnecting Pipework
Flared connections were made on both ends including on the thermostatic expansion valve for the evaporator. The lagging had previously been slid onto the pipework and held back with cable ties.
Electrical installation
The main wiring and for the condenser and evaporator were wired in. Then, the controller was fixed to the wall and wired in. Each sensor was wired back to the controller and the ohms checked against our chart.
Pressure Test during Cold Room Refrigeration Installation Manchester
The pipework and evaporator were pressure tested with our regulator and nitrogen including a steel braded hose and a ¼ turn shut off valve. This is so that the nitrogen cylinder can be quickly shut off and the hose prevented from bursting. There have been incidents in our industry where a regulator has jammed open and the full pressure of the nitrogen cylinder has filled the system until it burst. After the pressure test had been carried out according to standard industry guidelines, it was time to start the dehydration process…
Dehydration Process
This is an important part of the installation as the moisture in the air in the pipework has to be removed using a vacuum pump. A vacuum of 2 Torr is achieved which is below the saturation temperature of water, causing any moisture to be in its vapour state and removed from the system. Another aspect to the dehydration process is the removal of condensables from the system. These are gases that will not condenser under pressure, such as air and nitrogen left over from the pressure test. Our team carried out the evacuation process overnight which was observed by the end user in the morning.
0161 237 3727
service@maximuschillers.com
Commissioning of Cold Room Refrigeration Installation Manchester
The refrigerant was released around the system from the condenser and power instated.
Fault Finding
The controller immediately went into fault with a sensor alarm. Our lead engineer checked the wiring diagram and noticed that our installation engineer had put a sensor wire on to the wrong terminal. These things happen and this is why our lead engineer is available to fix the problems.
Run Testing during Cold Room Refrigeration Installation Manchester
The compressor went through a 300 second timer and then started up. There was a low pressure condition for the first couple of minutes while the refrigerant made its way around the system and started to build up behind the expansion valve.
Sight Glass
The sight glass was flashing which is a possible sign of a shortage of refrigerant. This is only an indication as various conditions can cause this to happen. The only way to properly check that the refrigerant charge is okay is to use a comparator to measure the superheat and subcooling…
Superheat and Subcooling
These readings were found to be outside of standard industry guidelines for this kind of plant. Therefore, additional refrigerant was charged into the system until the sight glass cleared and the readings became normal.
Monitoring during Cold Room Refrigeration Installation Manchester
The suction pressure, suction temperature, superheat, high side liquid pressure, high side liquid temperature, subcooling, compressor amps, compressor temperatures, sight glass, evaporator difference in temperature and cold room temperature were monitored. This monitoring was carried out all the way down to the 3°C set point with adjustments being made as required.
Heat Load
After all checks were carried our satisfactorily, the product was loaded into the cold room. This was to add heat load to the system and to test if the required capacity had been calculated correctly. The following morning, the compressor was cycling on and off and the set point was being maintained satisfactorily.
People also like this page: Refrigeration Installation Manchester
To find out about industrial process chillers, why not visit the Maximus Chillers website.
Leave a Reply